So you have installed Linux distribution Ubuntu on your PC, and now can't find your old Windows anymore? - Did you perhaps end up with an annoying boot menu each time you start the computer?
This simple tutorial will show you how to restore your system to your old Windows setup.
COMPUTERS A while back, I decided to give Linux distribution Ubuntu a try, installing it alongside my Windows 7 and XP dual-boot setup. At one point I was inclined by Ubuntu to perform a system update, which I approved. The update lead to a corrupted Ubuntu installation that simply wouldn’t start anymore. As I didn’t have any real use for it no more, I decided to just get rid of Linux altogether and return to my previous Windows 7 / XP multi-boot setup. It wasn’t as easy as expected, however; due to something called Grub2 – Ubuntu’s own, incredibly obstinate bootloader.
Then I found this simple solution…
Restore Windows after installing Linux/Ubuntu
When you do a proper Ubuntu installation on a PC that already runs an operating system such as Windows, you usually create a number of new separate partitions that your Linux distribution spans over (unless you're running some sort of virtual machine, then this guide is not for you, sorry). Once you reboot the computer, you’ll either jump straight into Ubuntu, or you’ll see its own boot menu, called Grub / Grub2. In either case, your Windows installation(s) won’t be the default OS.If the former is your case (seeing no boot menu upon startup), you’ll need to start the computer from your Windows 7 DVD and run the startup fixer, which will overwrite the boot record Ubuntu just hijacked upon its installation.
If you instead received a new boot menu (GRUB) along with Ubuntu, restoring the boot sequence with your Windows DVD may not work. For me it didn’t, anyway. Spending countless hours on help forums trying one futile method after the other, including various MS-DOS commands (such as 'fixmbr') supposed to fix the boot sequence but still didn’t manage to touch GRUB, I started losing hope. But eventually I found the solution in a free application called EasyBCD.
Remove Ubuntu GRUB menu with EasyBCD
Start by downloading the latest version of EasyBCD, by the time being v2.1.2Download EasyBCD (official host)
Install and run the application with administrator privileges (right-click the EasyBCD icon and choose ‘Run as administrator’).
 |
| Edit Boot Menu - EasyBCD Delete all occurrences of Linux (if any). |
 |
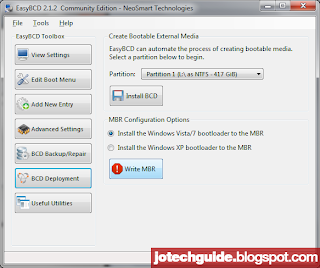
| BCD Deplayment - EasyBCD Overwrite the Ubuntu bootloader with your Windows loader, as specified (image above). |
Do this by choosing ‘Install the Vista/7 bootloader to the MBR’, and then press the ‘Write MBR’ button.
This should hopefully restore the boot menu to its previous state, running only Windows OS’s. Ubuntu is still present on your hard drive, however. You can get rid of it entirely by deleting those partitions, but first make sure the boot sequence is back in order. Close EasyBCD and restart your system to find out. You should head straight into Windows, or have a list of your Windows installations to choose from, if you have more than one installed.
To remove the Linux / Ubuntu installation altogether, move on to this guide:
Good luck!
~theJo


Post a Comment