Basic audio editing with Sony Sound Forge Pro 10
Learn how to work with effect chaining and more in Sony Sound Forge Pro 10 in this article!'Nuff talking, time for action, right? This is how you apply some nice affects to your audio:
1 - Open your audio file
Right, so the first step is to open your audio or video file (yes, you can even open a video file, straight within Sound Forge!). You do this, either by simply dragging the file in question into the work area of Sound Forge, or by going to the "File" menu and choosing "Open...".If you have a video file and only intend to edit the audio, you can detach the video, by choosing "Detach video" off the "File" menu.
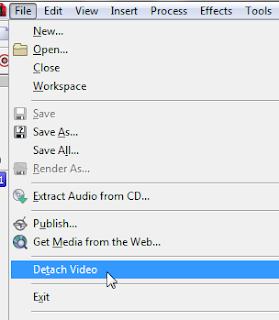
Detaching a video track in Sony Sound Forge Pro 10
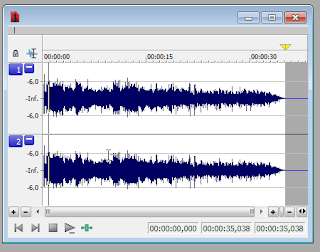
When you're done with that you should now have a little window looking something like this:
2 - Bring up the effect chainer
Down in the left corner of your audio file window, there should be a small, green icon. Click on it to bring up your effect chain: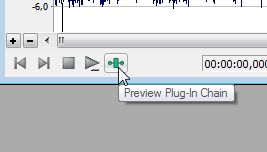
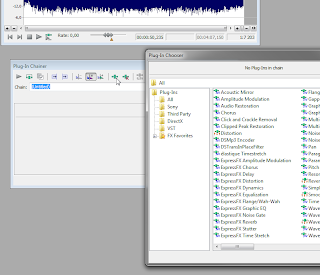
From the Plug-In Chainer window that just popped up, click the similar looking button saying "Add Plug-Ins to chain", which in turn brings up your whole library of effect plug-ins that are compatible with Sound Forge:
3 - Start adding effects
Now that you have your available plugins up and ready, it's just a matter of picking the one you wish to apply to your recording. You do this by double-clicking on your effects of choice, followed by choosing "OK". As soon as you start double-clicking, you should already see a chain of those effects building up at the top of the plugin browser window. Note however, that you must click OK when done, in order to apply the plugins to the chain. Simply closing the plugin browser window will leave your chain unaltered (ergo: empty).When you have successfully made your selection of effects, your chain might be looking something like this:
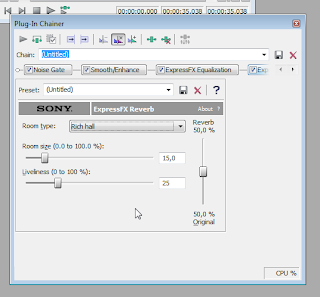
To hear what the recording sounds like with all effects turned on, click the icon below, at the bottom of your sound file window:
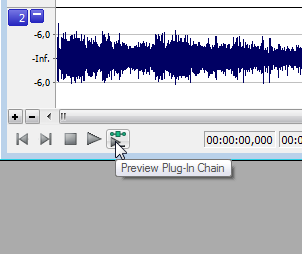
The recording will start playing through all your effects.
So far so good, hopefully!
4 - Re-order and tweak your effects
Your plugins are now placed on top of your original audio. However, this is merely the beginning. Now comes the delicate work involving your ears. To get the desired effect of the plugins, you should go over each one and adjust their individual settings to a level appropriate for your work.Furthermore, it is important to consider in which order the plugins are placed in the chain. For instance, if you want to get rid of clicks, hums and other types of distorting noise, you should do so as soon as possible, as these noises could get further amplified if you instead choose to have other funky effects placed earlier in the chain!
Bypass switching
A nice way to hear what difference your effects make for your recording is to toggle the bypass switch (see picture below). The word "bypass" means that the sound signal passes right through all your plugins unaltered; thus you will again hear your original sound recording. When bypass is off (default state) the audio will come across with all plugins applied.
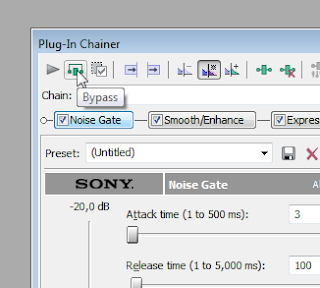
I might go through some of the plugins and what they do in more detail later on. For now, I leave that to you to play around with for yourself.
5-Don't lose your chain! (IMPORTANT!)
This might sound obvious, but it is a very important step that will save you from doing a lot of double work in the future.When you have an effect chain that you are happy with, do NOT forget to save it amongst your presets! You do so by typing a descriptive name in the field next to the label "Chain:", followed by a click on the little floppy disk icon to the right:
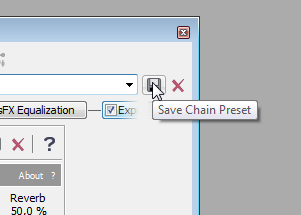
You can now easily apply this chain to your future audio editing work by simply choosing that preset in your plugin chainer window.
6-Export your work
Now that you're satisfied with the sound of your recording, it's time to save it, so that you can use it outside of Sound Forge. You do so by simply selecting "Save as..." in the "File" menu.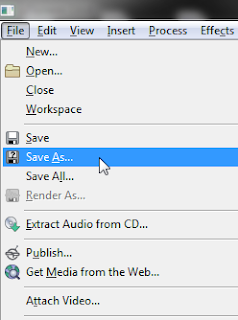
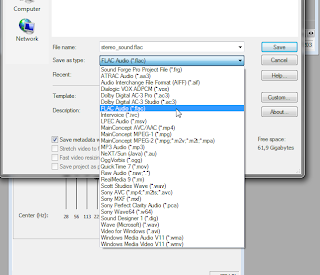
Stay lossless!
I strongly suggest saving your work in a lossless format, such as uncompressed wave, or even better - FLAC, which uses a lossless type of compression - thus, offering the best of both worlds!
Sure, an uncompressed or lossless compressed file will take up a few megabytes more off your hard drive than a lossy one, but you can always make a compressed mp3 out of it later if you wish. You can never go back if you choose a lossy format to begin with! Furthermore, if you decide to use the audio for a YouTube video, for instance, the audio will again be compressed. And you should always try to keep audio and video intact as far as possible in your work for optimal quality!
That's it for now, check back for more tutorials coming up very soon!
~theJo

I like your all post. You have done really good work. Thank you for the information you provide, it helped me a lot.
ReplyDeleteSound Forge Pro Crack
HandBrake CS2 Crack
MacKeeper Crack
NCH Express Zip Crack
TeamViewer Crack
HandBrake CS2 Crack
WavePad Sound Editor Crack
Adobe Lightroom Crack
Very Nice Blog this amazing Software.
ReplyDeleteThank for sharing Good Luck!
I am very impressed with your post because this post is very beneficial for me and provide a new knowledge…
I like your all post. You have done really good work. Thank you for the information you provide, it helped me a lot.
Sound Forge Pro Crack
Driver Magician Crack
USB Disk Security Crack
PC Reviver Crack
Sound Forge Pro Crack
Wise Care 365 Pro Crack
Audio Editing With Sony Sound Forge, Pt. 2 - Effect Chaining >>>>> Download Now
ReplyDelete>>>>> Download Full
Audio Editing With Sony Sound Forge, Pt. 2 - Effect Chaining >>>>> Download LINK
>>>>> Download Now
Audio Editing With Sony Sound Forge, Pt. 2 - Effect Chaining >>>>> Download Full
>>>>> Download LINK 2y
Audio Editing With Sony Sound Forge, Pt. 2 - Effect Chaining >>>>> Download Now
ReplyDelete>>>>> Download Full
Audio Editing With Sony Sound Forge, Pt. 2 - Effect Chaining >>>>> Download LINK
>>>>> Download Now
Audio Editing With Sony Sound Forge, Pt. 2 - Effect Chaining >>>>> Download Full
>>>>> Download LINK m6
Post a Comment